Sarah's Beginner Method

This is a tutorial on how to solve a Rubik's Cube for those who have little or no experience with cubing.

Unlike most Rubik's Cube tutorials, this one is driven by current research in the field of education. The author is both an educator and a speedcuber. Here is an essay on the research behind this tutorial.

  • 0 – About This Tutorial
  • 1 – How the Cube Works
  • 2 – The White Cross
  • 3 – The White Corners
  • 4 – The Equator
  • 5 – Flipping the Yellow Edges
  • 6 – Twisting the Yellow Corners
  • 7 – Placing the Yellow Corners
  • 8 – Placing the Yellow Edges

About This Tutorial

⚪ Introduction: About This Tutorial

If you want to learn how to solve the Rubik's Cube, you've come to the right place!

This tutorial...

  • is friendly for kids, teens, and adults.
  • is friendly for left-handed, right-handed, and ambidextrous people.
  • focuses on learning and understanding over memorizing.
  • provides choices along the way.

🟦 Information: Headings

Every page has a heading.

For example, the heading on this page is Information: Headings.

A heading describes the main focus of the page.

  • 🟦 Information: New information for you to read before you learn the next step.
  • 🟡 Explanation: An explanation on why something works the way it does.
  • 🟢 Action: Instructions for you to do something with your cube.
  • 🛑 Pause and Think: An opportunity for you to try to figure out something before you reveal the answer.
  • ⚪ Introduction: The first page in each step.
  • ⚪ Conclusion: The last page in each step.

🟦 Information: Twisty Player

This tutorial uses Twisty Player, a tool made by Lucas Garron.

Here is what Twisty Player looks like. Click on the cube and drag your mouse to look at the cube from different angles.

Sometimes there is a control panel with a play button. Click the play button to watch the cube turn.

🟦 Information: Missing Stickers

Sometimes there will be pieces with missing stickers.

Dark grey stickers can be any colour. When we see a dark grey sticker, the actual colour of the sticker is not important to us right now because we will be solving them in a later step.
Pink stickers already in their correct spots. When we see a pink sticker, we can assume we already solved it in a previous step and there is something else for us to focus on right now.

⚪ Conclusion: About This Tutorial

This is the end of this step. You are ready to learn how the cube works!

Next Step: 1 – How the Cube Works

How the Cube Works

⚪ Introduction: How the Cube Works


Before we learn how to solve the cube, let's learn how the cube is held together.

This will help us understand what we're doing better.

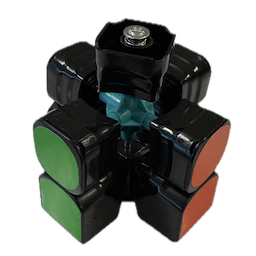
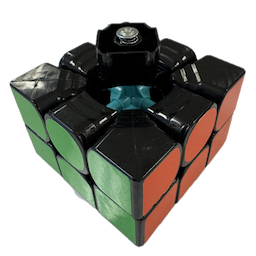
🟢 Action: Take the Cube Apart

To take the cube apart, pop off one of the caps on a center piece.

If you're following along, do this on the yellow face.

Next, use a screwdriver to loosen the screw until the pieces start to fall apart.

Then, take out all the pieces.

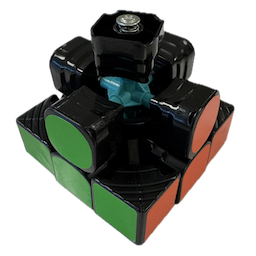
🟦 Information: The Core

The part that holds everything together is called the core.

All the center pieces on the core are connected to each other. This is important because it means the centers never move away from each other.

When we turn the cube, we're really just turning the pieces around the centers.

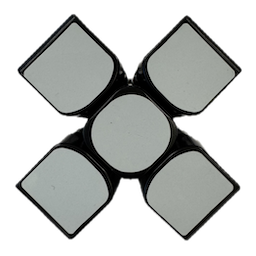
🟦 Information: Parts of the Cube

These are all the different types of pieces.

These are the center pieces.
These are the corner pieces.
These are the edge pieces.

🟡 Explanation: Solving Pieces, Not Stickers

When we're solving the cube, we're not solving stickers, we're solving pieces. Every piece has one correct spot where it belongs. The cube is solved when every piece is in its correct spot.

This might look like we have made good progress because the white face looks done, but the problem is that every piece is in the wrong spot.

This is what it looks like when the white face is done. Every white piece is in its correct spot.

🟢 Action: Put the White Edges In

It's important that we don't put the pieces back in randomly, because that might make the cube impossible to solve without taking it apart again.

Here is how to put the cube back together.

Start by making the core stable so it won't fall over. Put the four white edge pieces in their correct spots.

This creates a shape called a cross.

🟢 Action: Put the White Corners In

Next, put the four white corners in their correct spots.

This will complete the first layer.

🟢 Action: Put the Middle Layer Edges In

Next, put the four middle layer edges. These are the edges that don't have white or yellow on them.

This will complete the first two layers, or F2L for short.

🟢 Action: Put the Yellow Pieces In

So far, the order we've been putting in the pieces matches the way we'll be solving the cube, but the last layer will be different.

Put the yellow corners and yellow edges in their correct spots in any order as long as an edge piece goes in last.

It's easier to put the pieces in when the layer is turned by half a move.

🟢 Action: Tighten the Screw

Lastly, tighten the screw and put the yellow cap back on.

Once you do this, you will be ready for the rest of the tutorial.

⚪ Conclusion: How the Cube Works

You are ready to learn how to solve the cube without taking it apart! You can go on to the next step.

Next Step: 2 – The White Cross

The White Cross

⚪ Introduction: The White Cross

The cross is just another name for this plus sign shape.

🟦 Information: Cross Pieces

When we solve the cube layer by layer, we start by making a cross.

We'll use white for the colour of the cross. We'll call the white edges cross pieces from now on. As you get better at solving the cube, you can try other colours for the cross too.

This is what it will look like when all the white cross pieces are in their correct spot.

🟦 Information: Two Options

This tutorial has two options for how to learn the cross.

  1. Option #1: You can choose to follow a step-by-step process.
  2. Option #2: You can learn how to create your own process.

I recommend skimming both options before selecting which one you want.

Option #1 starts on the next page. Option #2 starts on Page 12.

🟦 Information: Option #1

This is a step-by-step process that you can follow.

This process for solving the cross is called the Daisy Method. We make a shape that looks like a daisy flower (yellow center with white petals). This helps us put all the cross pieces in the right place more easily.

While we are doing the Daisy Method, we will have the white face on the bottom and the yellow face facing up.

🟦 Information: Good Edges (Option #1)

When we look at the cube, every cross piece is either a good edge or a bad edge. "Good" means we can put the white sticker on the yellow face with just one turn.

This is a good edge.

This is also a good edge because turning a face twice counts as one turn.

🟢 Action: Place the Good Edges (Option #1)

We start by working on all the good edges.

As we do this, we need to be careful not to take out any white edges we have already put. In this example, if we put the white edge right away, we take out a different white edge.

If we're about to take out a white edge we already put, we can turn the top layer first to keep it safe.

🟦 Information: Bad Edges (Option #1)

When we run out of good edges, we can work on the bad edges.

This is a bad edge.
This is also a bad edge.

🟢 Action: Place the Bad Edges (Option #1)

We can turn a bad edge into a good edge by moving it to the middle layer, which we call the equator.

This pink line is the equator.

Here is how to move this bad edge to the equator.

🟢 Action: Place the Bad Edges (Option #1)

Just like before, we don't want to take out any edges we already put, so we can turn the top layer first to keep them safe.

We might need to turn the top layer before putting the bad edge into the equator and turn the top layer again before putting the edge into the top layer. Here are some examples to give you an idea of how to do this.

Example #1.
Example #2.
Example #3.
Example #4.
Example #5.

🟢 Action: Solve a Cross Piece (Option #1)

Once we've made the daisy, it's time to move each cross piece to its correct spot.

Pick one of the cross pieces and line up the non-white colour with the center in the equator. Then we can turn it twice to move it to its correct spot.

Example: Solving the white-green cross piece.

🟢 Action: Solve the Cross Pieces (Option #1)

We do the same thing for all the cross pieces in any order we want. Then we're done the cross!

Here is a full example where the edges are put in this order: 1. white-green, 2. white-red, 3. white-orange, 4. white-blue.

🟦 Information: Option #2

For this option, you will be given some examples of moving the cross pieces along with some examples, but most of your learning will happen through practice.

If you are satisfied with the step-by-step process (the Daisy Method), then you can skip to the last page in this step.

The step-by-step process involves making a daisy shape before putting each cross piece in its correct spot.

Instead of doing this, we can put each cross in its correct spot right away. This is trickier, but it's faster once you get used to it.

While we are doing this process, we will have the yellow face on the bottom and the white face facing up.

🟦 Information: Good Edges and Bad Edges (Option #2)

When we look at the cube, every cross piece is either a "good edge" or a "bad edge". "Good" means we can put the white sticker on the white face with just one turn.

This is a good edge.

This is also a good edge because turning a face twice counts as one turn.

🟢 Action: Solve the First Cross Piece (Option #2)

We start by putting one good edge on the white face.

🟦 Information: Bad Edges (Option #2)

Before we put the other edges on the white face, we need to know how to turn bad edges into good edges.

Examples of bad edges:

This is a bad edge.
This is also a bad edge.

🟦 Information: Fixing Bad Edges (Option #2)

We can turn a bad edge into a good edge by putting it in the middle layer, which we call the equator.

This pink line is the equator.

Here is how to move this bad edge to the equator.

🟦 Information: Where Each Cross Piece Belongs (Option #2)

After we put the first cross piece on the white face, we need to be aware of where each cross piece actually belongs. We can look at the centers on the equators to see which colours are next to each other.

This is an example of putting the white-blue edge across the white-green edge.

This is an example of putting the white-orange edge next to the white-green edge.

This is an example of putting the white-red edge next to the white-green edge.

🟢 Action: Solve the Cross (Option #2)

Here is a full example where the edges are put in this order: 1. white-green, 2. white-blue, 3. white-red, 4. white-orange.

🟦 Information: Fixing the Cross (Option #2)

If we accidentally put the cross edges in the wrong spots, we can take them out and put them back in their correct spots.

Here is an example of swapping white-green and white-orange.
Here is an example of swapping white-green and white-blue.

🟦 Information: Solving the Cross Quickly

The fastest way to solve the cross is to figure out the best order to do the cross pieces and to work on more than one cross piece at a time.

The cross can always be solved in 8 turns or less. The more you practice, the better you will get at solving the cross in fewer turns.

⚪ Conclusion: The White Cross

You've now learned how to solve the white cross! You can go on to the next step.

Next Step: 3 – The White Corners

The White Corners

⚪ Introduction: The White Corners

At this point, your cube should have the white edges solved. These pieces form the white cross.

In this step, we will solve the white corners. This will complete the first layer.


While we are doing this step, we will have the white face on the bottom and the yellow face facing up.

We will keep holding the cube this way for the rest of the tutorial.

🟦 Information: Good Corners and Bad Corners

Every white corner is either a good corner or a bad corner.

A good corner is in the top layer and has a white sticker touching the equator (the pink line). There are only two possibilities.

This is a good corner.
This is a bad corner because the white sticker does not touch the equator.

🟢 Action: Find a Good Corner

When we see a good corner, we can turn the top layer so the corner is above its correct spot.

This is one possibility. The white sticker is facing the left.
This is the other possibility. The white sticker is facing the right.

🛑 Pause and Think: The Three Turns

In both cases, we can bring the corner to its correct spot in three turns.

Try to figure out what the three turns are before looking at the answer on the next page.

🟢 Action: Solve the Good Corners

Here are the answers.

Do this if the white sticker is facing the left.
Do this if the white sticker is facing the right.

Repeat the same process for all your good corners until there are no more good corners left.

🟦 Information: Standard Notation

It's a good idea to learn how to write down the turns we make so that we can communicate more easily.

We're going to learn something called standard notation.

"Notation" means we're using letters, numbers, and symbols. "Standard" means the most common way.

🟦 Information: Standard Notation

When we turn a face, we write the first letter of the face. If we're turning it clockwise, we don't need to write anything else.

To know whether we're turning a face clockwise or counterclockwise, rotate the cube to see which way we're turning the center of the face.

R (right face clockwise) L (left face clockwise) U (upper face clockwise)

🟦 Information: Standard Notation

When we turn a face the other way, we write a symbol that looks like an apostrophe.

We say "prime" for the symbol.

R' (right face counterclockwise) L' (left face counterclockwise) U' (upper face counterclockwise)

🟦 Information: Algorithms

An algorithm is a list of turns put together.

The two algorithms we just saw are L' U' L and R U R'.

L' U' L R U R'

🟦 Information: Right Flick and Left Flick

R U R' and L' U' L are the only two algorithms we need to solve all the first layer corners. We'll give them nicknames since we'll be using them a lot.

R U R' is right flick and L' U' L is left flick.

🟦 Information: Right Flick and Left Flick

When we use the right flick and left flick, we need to hold the cube the correct way.

For the right flick, make sure the corner is on the right. For the left flick, make sure it's on the left.

L' U' L (left flick) R U R' (right flick)

🟦 Information: Twisty Player

The cube in Twisty Player will be slightly rotated to the left for lefty algorithms and slightly rotated to the right for righty algorithms.

This will make it easier to see the pieces we need.

A lefty algorithm. In this example, orange is the front face and green is the right face. A righty algorithm. In this example, green is the front face and orange is the left face.

🟦 Information: Bad Corners

After we solve all the good corners, we might have some bad corners left.

There are four possible situations.

Situation #1: The bad corner is in the bottom layer in the wrong spot and the white sticker is facing down.
Situation #2: The bad corner is in the bottom layer and the white sticker is facing left.
Situation #3: The bad corner is in the bottom layer and the white sticker is facing right.
Situation #4: The bad corner is in the top layer and the white sticker is facing up.

You may need to jump back and forth between the next few pages depending on which situations you have.

🟢 Action: Solve the Bad Corners (Situation #1)

In this situation, we can choose between using our right hand or our left hand.

If we have this situation, put the corner on the left if you're left-handed or on the right if you are right-handed.

Follow these steps if you are left-handed.

Do the left flick to turn the bad corner into a good corner.
Then, put the corner above its correct spot and do a right flick to solve it.

Follow these steps if you are right-handed.

Do the right flick to turn the bad corner into a good corner.
Then, put the corner above its correct spot and do a left flick to solve it.

🟢 Action: Solve the Bad Corners (Situation #2)

In this situation, we will be using our left hand.

If we have this situation, put the corner on the left and do a left flick to turn it into a good corner.
Then, put the corner above its correct spot and do a left flick to solve it.

🟢 Action: Solve the Bad Corners (Situation #3)

For this situation, we will be using our right hand.

If we have this situation, put the corner on the right and do a right flick to turn it into a good corner.
Then, put the corner above its correct spot and do a right flick to solve it.

🟢 Action: Solve the Bad Corners (Situation #4)

In this situation, we can choose between using our right hand or our left hand.

If we have this situation, put the corner on the left if you're left-handed or on the right if you are right-handed.

Follow these steps if you are left-handed.

Do the left flick.
It will still be a bad corner, but we can do the same flick again to turn it into a good corner.
After we move the corner above where it belongs, the same flick will solve it.

Follow these steps if you are right-handed.

Do the right flick.
It will still be a bad corner, but we can do the same flick again to turn it into a good corner.
After we move the corner above where it belongs, the same flick will solve it.

⚪ Conclusion: The White Corners

You've now learned how to solve the first layer! You can go on to the next step.

Next Step: 4 – The Equator

The Equator

⚪ Introduction: The Equator

At this point, your cube should have the white layer solved.

In this step, we will solve the equator. This will complete the first two layers.

🟡 Explanation: The Strategy

We're going to use a strategy we've already seen before.

When we have a first layer corner that is in the first layer but in the wrong spot, we can take it out and put it into its correct spot.

This time, we're going to take out a corner we've already solved and put it back in differently.

In this example, the white-green-orange corner is taken out of its spot and put back in differently.

🟡 Explanation: The Strategy

When we take a corner out of its spot and put it back in differently, we can change the edge piece above it.

The edge above the white-green-orange corner moves into the top layer.
This is the same algorithm as above, but it shows the edge in the top layer that moves above the white-green-orange corner.

🟦 Information: Flipped Edges

We need to pay attention to which way the edge is facing because we might put it in backwards.

This equator edge is flipped when we put it in because we weren't paying attention to which way it was facing.

🛑 Pause and Think: Solving Equator Edges

Try to figure out how to correctly place the equator edge from the previous example before moving on to the next page.

Hint: Use the same strategy, but try the left-handed version. There is one other detail for you to find out.

🟦 Information: Good Edges and Bad Edges

Every edge that belongs in the equator is either a good edge or a bad edge.

A good edge is a non-yellow edge in the top layer.

Both of these are good edges.

🟢 Action: Find a Good Edge

When we see a good edge, we can turn the top layer so the edge aligns with the colour of the center below it.

There are two situations.

Situation #1: The stickers match on the right side. In this example, the orange stickers match.
Situation #2: The stickers match on the left side. In this example, the green stickers match.

🟢 Action: Solve the Good Edges (Situation #1)

In this situation, move the edge away with a U'.
Then do a left flick to take out the corner.
Then do a U to put the corner above where it belongs.
Then do a right flick to put the corner back in. This will bring the edge with it.

🟢 Action: Solve the Good Edges (Situation #2)

In this situation, move the edge away with a U.
Then do a right flick to take out the corner.
Then do a U' to move the corner above where it belongs.
Then do a left flick to put the corner back in. This will bring the edge with it.

🟦 Information: Bad Edges

After all the good edges are solved, we can solve the bad edges.

A bad edge is a non-yellow edge that is either

  • in the equator in the wrong spot
  • in the equator in the correct spot, but flipped
Both of these are bad edges.

🟢 Action: Turn a Bad Edge into a Good Edge

We can move a bad edge into the top layer by putting a yellow edge into its spot.

Example #1: Moving a bad edge into the top layer.
Example #2: Moving a bad edge into the top layer.

Now it's a good edge and we can solve it the same way as before.

⚪ Conclusion: The Equator

You've now learned how to solve the first two layers! You can go on to the next step.

Next Step: 5 – Flipping the Yellow Edges

Flipping the Yellow Edges

⚪ Introduction: Flipping the Yellow Edges

At this point, your cube should have the first two layers solved.

In this step, we will make all the yellow edges face up. This will make a yellow cross.

🟢 Action: Tape Pairs Together

The first two layers include the white cross and four F2L pairs.

F2L stands for first two layers.

Each F2L pair is a corner on the first layer attached to the edge above it in the equator.

We will be solving the entire last layer just by taking out the pairs and putting them back in differently.

Each pair will stay together from now on. You can tape together the two pieces in each pair. This can help you figure out if you made a mistake when you're doing an algorithm.

🟦 Information: Last Layer Algorithms

We're going to be solving the last layer using only three new algorithms.

Each of these algorithms:

  • keep the four F2L pairs together
  • are seven turns or less
  • can be transformed to create new algorithms
  • are used by speedcubers

🟦 Information: The Front Face

We have seen R, L, and U in algorithms. We're now going to see F too. The letter F stands for the front face.

F (front face clockwise) F' (front face counterclockwise)

🟦 Information: Inverses and Inverting

We're going to learn about something called an inverse. Whenever we undo a turn we just did, we call that the inverse.

For example, we can undo F with F'.

F F'

🟦 Information: Inverses and Inverting

We can also invert an algorithm.

If we do F R, we can undo that with R' F'.

F R R' F'

Notice that we do the turns in reverse order and we do each of them in the opposite direction.

🟦 Information: Last Layer Algorithm #1

If we do F R U, we can undo that with U' R' F'.

F R U U' R' F'

The algorithm F R U U' R' F' happens to look very similar to the shortest algorithm that moves around pieces in the last layer. All we need to do is swap the U' and R'.

F R U R' U' F'

When we do F R U R' U' F', we flip some of the yellow edges and move around most of the yellow pieces. Notice how the F2L pairs stay together throughout the algorithm.

🟦 Information: Mirrors and Mirroring

One of the ways we can transform an algorithm is by mirroring it.

For us, this will mean taking a right-handed algorithm and making it left-handed. Or taking a left-handed algorithm and making it right-handed.

The mirror of F R U R' U' F' is F' L' U' L U F.

F R U R' U' F'
F' L' U' L U F

🟦 Information: Yellow Edges

There are four situations for how the yellow edges are flipped.

Situation #0: All the yellow stickers are facing up.

If we already have this yellow cross, we are done this step!
Situation #1: The yellow stickers make a line.
Situation #3: The yellow stickers make an "L" shape.
Situation #4: None of the yellow stickers are facing up.

🟢 Action: Flip the Yellow Edges (Situation #1)

We use F R U R' U' F' and F' L' U' L U F when we have two yellow edges facing up and they form a line.

Pick F R U R' U' F' if you are right-handed and pick F' L' U' L U F if you are left-handed. Hold the cube so that the line is horizontal, then do either algorithm.

F R U R' U' F'
F' L' U' L U F

🟦 Information: Inverting Situation #1

We need a bit more information before we can solve Situation #2.

We learned about inverses earlier. Inverting is another way to transform an algorithm, just like mirroring.

The inverse of F R U R' U' F' is F U R U' R' F'.

The inverse of F' L' U' L U F is F U R U' R' F'.

🟢 Action: Flip the Yellow Edges (Situation #2)

If you are left-handed, hold the cube so that you see an L.

If you are right-handed, hold the cube so that you see a backward L.

F U R U' R' F'
F' U' L' U L F

🟢 Action: Flip the Yellow Edges (Situation #3)

Sometimes we don't get a line or an L. If we get a dot, we can do F R U R' U' F' of any of its transformations.

Then, we will get a line or an L and we can solve it like Situation #1 or #2.

🟦 Information: Impossible Situations

It is impossible to solve the cube when there are exactly one or three yellow stickers facing up.

If you have this, it is likely because the pieces were taken apart and put back in wrong. It can be fixed by taking the pieces back out again and putting them back in incorrectly.

This is impossible to solve.
This is also impossible to solve.

⚪ Conclusion: Flipping the Yellow Edges

You've now learned how to make the yellow cross! You can go on to the next step.

Next Step: 6 – Twisting the Yellow Corners

Twisting the Yellow Corners

⚪ Introduction: Twisting the Yellow Corners

At this point, your cube should have the first two layers solved and a yellow cross on the last layer.

In this step, we will make the rest of the yellow stickers face up.

🟡 Explanation: The Strategy

We're going to learn an algorithm that is similar to something we've seen before.

When we solved the second layer edges, we took out the first layer corners and put them back differently.

Here is an example of taking out a first layer corner and putting it back in differently.

🟡 Explanation: The Strategy

This time, we're going to take out an F2L pair instead of just a corner.

Do a right flick to take out a pair.
Then, turn the U face to move the pair farther away from where it was before.

Then, we only need three turns to put the pair back in its correct spot.

🛑 Pause and Think: The Three Turns

Try to figure out what the three turns are before moving on to the next page.

Hint: A double turn counts as one turn.

This is a double turn.

🟦 Information: Last Layer Algorithm #2

Here's the answer. We can do a right flick again except we turn the U face twice. We call this the right double flick.

The algorithm is R U2 R'. The 2 represents a double turn. We can choose to go clockwise or counterclockwise since they both do the same thing.

This algorithm is named sune. It's a Swedish name given by a Swedish cuber.

R U R' U R U2 R'

🛑 Pause and Think: Left Sune

We're going to call R U R' U R U2 R' the right sune because there is also the left sune.

Try to figure out what the left sune is before looking at the answer in the next page.

🟡 Explanation: Left Sune

The left sune is just the mirror of the right sune. Here is how to do it.

Do a left flick to take out a pair.
Then, turn the U face to move the pair farther away from its spot.
Then, do a left double flick to put the pair back into its spot.

Here is the full algorithm.

L' U' L U L' U2 L (left sune))

🟦 Information: Twisted Yellow Corners

Both the left sune and the right sune twist three corners, although we will sometimes need to twist two or four corners.

We'll say a corner is twisted if the yellow sticker is not facing up.

Situation #0: 0 twisted corners

If we already have the entire yellow face, we are done this step!

Situation #1: 3 twisted corners

Situation #2: 1 twisted corners

Situation #3: 4 twisted corners

🟢 Action: Twist the Yellow Corners (Situation #1)

If there are three twisted corners, hold the cube so that the non-twisted corner is at the front and there is one yellow sticker facing towards us.

If the twisted corner is on the left, do the left sune.
If the twisted corner is on the right, do the right sune.

🟢 Action: Twist the Yellow Corners (Situation #2)

If there are two twisted corners, hold the cube so that one yellow sticker is facing towards us.

The twisted corner goes on the left when it needs to be twisted counterclockwise.
The twisted corner is on the right when it needs to be twisted clockwise.

If the twisted corner is on the left, do the left sune.
Then, there will be three twisted corners.

If the twisted corner is on the right, do the right sune.
Then, there will be three twisted corners.

🟢 Action: Twist the Yellow Corners (Situation #3)

If there are four twisted corners, hold the cube so there is no yellow sticker facing forward.

You can choose either left sune or right sune. Then, there will be three twisted corners.

Right sune

Left sune

🟦 Information: Impossible Situations

It is impossible to solve the cube when there is exactly one twisted corner.

If you have this, it is likely because the pieces were taken apart and put back in wrong. It can be fixed by taking the pieces back out again and putting them back in incorrectly.

This is impossible to solve.
This is also impossible to solve.

⚪ Conclusion: Twisting the Yellow Corners

You've now learned how to make all the yellow stickers face up! You can go on to the next step.

Next Step: 7 – Placing the Yellow Corners

Placing the Yellow Corners

⚪ Introduction: Placing the Yellow Corners

At this point, your cube should have the first two layers solved and all the yellow stickers facing up.

In this step, we will make move the yellow corners to their correct spots.

🟡 Explanation: The Strategy

We're going to start by taking a closer look at the sunes.

If we do the right sune then a U2, we can see that all the yellow corners stay in their correct spots, even though some of them are twisted.

🟦 Information: Last Layer Algorithm #3

Since we want to move around the yellow corners, we need a new algorithm to swap corners. The one we're learning is named niklas. It was named by the same Swedish cuber who named the sune.

The niklas takes out two F2L pairs and then puts them back in differently. There is a right niklas and a left niklas.

🟡 Explanation: Right Niklas

The right niklas starts by moving the right F2L pair up, then moving it away.
Then, we do the same thing to the left F2L pair.
Then, we move the right F2L pair down.
Then, we move the left pair towards us and move it down.

🟡 Explanation: Right Niklas

Here it is all together.

R U' L' U R' U' L (right niklas)

🛑 Pause and Think: Left Niklas

Try to figure out what the left niklas is before looking at the answer on the next page.

🟡 Explanation: Left Niklas

The right niklas starts by moving the right F2L pair up, then moving it away.
Then, we do the same thing to the left F2L pair.
Then, we move the right F2L pair down.
Then, we move the left pair towards us and move it down.

🟡 Explanation: Left Niklas

Here it is all together.

L' U R U' L U R' (left niklas)

🟡 Explanation: Moving the Yellow Corners

After doing a niklas, we can do a sune to untwist the three corners that the niklas twisted. This will allow us to move around the yellow corners.

L' U R U' L U R' R U R' U R U2 R'

(left niklas + right sune)
R U' L' U R' U' L L' U' L U' L' U2 L

(right niklas + left sune)

🟦 Information: Headlights

If there are two of the same colours on the same side, we call that headlights.

This is an example of headlights on the green side.
If there are headlights on all four sides, all the corners are solved!

🟦 Information: Yellow Corners

There are three situations for the yellow corners.

Situation #0: There are headlights on four faces.

We are done this step! But, we might need to turn the top layer to put the corners in their correct spots.
Situation #1: There are headlights on one face.

This example has green headlights.
Situation #2: There are no headlights.

🟢 Action: Move the Corners (Situation #1)

If only one side has headlights, turn the top layer so that the headlights are in their correct spots.

If you're left-handed, hold the cube so that the headlights face left.

Then, do a left niklas then a right sune.
If you're right-handed, hold the cube so that the headlights face right.

Then, do a right niklas then a left sune.

🟢 Action: Move the Corners (Situation #2)

If there are no headlights, hold the cube any way as long as yellow is facing up. Then, do a left niklas if you're left-handed or a right niklas if you're right-handed.

Here is a left-handed example.
Here is a right-handed example.

Then, you can find the headlights and solve the yellow corners like Situation #1.

This is a full left-handed example.
This is a full right-handed example.

🟦 Information: Cancellations

You might have noticed that the first turn of the sune undoes the last turn of the niklas. If we want, we can avoid doing these two turns. This is called a cancellation.

But, I suggest practicing the algorithms without the cancellations at first. Doing cancellations can make it harder to keep track of what move you are on.

L' U R U' L U2 R' U R U2 R'

(left niklas + right sune, with cancellations)
R U' L' U R' U2 L U' L' U2 L

(right niklas + left sune, with cancellations)

⚪ Conclusion: Placing the Yellow Corners

You've now learned how to solve the yellow corners! You can go on to the last step.

Next Step: 8 – Placing the Yellow Edges

Placing the Yellow Edges

⚪ Introduction: Placing the Yellow Edges

At this point, your cube should have the first two layers solved, all the yellow stickers facing up, and the yellow corners solved.

In this step, we will make move the yellow edges to their correct spots. This will solve the cube.

🟡 Explanation: Sunes

We don't need any new algorithms to solve the last four pieces. We just need to take another close look at the sunes.

We learned in the previous step that if we do the right sune, it twists three corners but doesn't actually move them around.

We can also see here that it moves three edges.
We can untwist the three corners using the left sune.

This lets us move the yellow edges without moving the pieces we've already solved.

🟡 Explanation: Sunes

We can move the three yellow edges in the other direction by doing the left sune first and the right sune second.

🟦 Information: Yellow Edges

There are three situations for how the yellow edges are placed.

Situation #0: All the yellow edges are in their correct places.

If we already have this, we are done this step and have finished solving the cube!

Situation #1: One yellow edge is in its correct place.

Situation #2: No yellow edges are in their correct places.

🟢 Action: Move the Yellow Edges (Situation #1)

When we have one yellow edge solved and need to move the other three yellow edges, hold the cube so that the solved edge is at the back.

The three edges go either clockwise or counterclockwise. To figure out which one it is, look for the sticker that belongs at the front.

If the sticker that belongs on the front is on the left side, start with the left sune.

In this example, the front colour is green and the green sticker is on the left side (on the red face).
If the sticker that belongs on the front is on the right side, start with the right sune.

In this example, the front colour is green and the green sticker is on the right side (on the orange face).

🟢 Action: Move the Yellow Edges (Situation #2)

If none of the four edges are solved, we can move three edges at a time. Hold the cube from any angle (as long as yellow is on top).

Do a left sune if you are left-handed and do a right sune if you're right-handed, then twist the corners using the other sune.

Examples for left-handed people


Examples for right-handed people

This will solve one edge and leave three edges unsolved. We can move them around just like in Situation #1.

🟦 Information: Impossible Situations

It is impossible to solve the cube when there are exactly two unsolved edges.

If you have this, it is likely because the pieces were taken apart and put back in wrong. It can be fixed by taking the pieces back out again and putting them back in incorrectly.

This is impossible to solve.
This is also impossible to solve.

⚪ Conclusion: Placing the Yellow Edges

You've now learned how to solve the entire cube. Congratulations!